Followers

Saturday, December 26, 2009

Sugar, Spice and Sweets That Are So Nice!

Christmas is my most favorite time of the year!  
It is also my favorite time to bake all these yummy festive treats that are sure to please all the relatives :) 
Here are a few of my holiday favorites to bake! :)

Buche de Noel ( aka Yule Log)
 
The Buche de Noel  I have here is a yummy chocolate sponge cake rolled with chocolate buttercream and then slathered with bittersweet chocolate ganache to make it look like a tree trunk.   I used chocolate mushrooms cookies which you can buy from the Asian market if you dont have time to make meringue mushrooms :D


Pumpkin and Cream Cheese 
is one of my favorite sweet treats!


And this one is GLUTEN- FREE! :D

Gluten-Free Pumpkin Cupcakes

1 cup (250 mL) granulated sugar
2 large eggs
1 1/4 cups (310 mL) brown rice flour mix
1/4 tsp (1.5 mL) salt
1 1/2 tsp (7.5 mL) baking powder
1/2 tsp (2.5 mL) xanthan gum
1/4 cup (125 mL) canola oil
½ cup of pumpkin puree
1/3 cup (125 mL) milk
1 tsp (5 mL) pure vanilla extract

Preheat oven to 350 F/180 C. Position rack in centre of oven. Sift together flour, salt, baking powder, xanthan gum in separate bowl and set aside.

Place cupcake baking liners in a 12-cupcake baking pan.

Beat sugar and eggs in large bowl of electric mixer at medium speed for one minute. Then add canola oil, pumpkin puree, milk and vanilla; beat at medium speed for one minute. Then gradually mix in the dry ingredients until incorporated, don’t overmix. Pour batter into prepared pan or cupcake pan.

Place in center of oven and bake for about 20 minutes or until centre springs back when touched and cupcakes are very lightly browned (bake about 35 minutes for nine-inch round, 40 minutes for eight-inch round). Cool on rack for five minutes. Remove cupcakes from pan onto rack and cool completely before icing. Top with tangy Cream Cheese buttercream!  I also made a pretty gold and copper dusted leaf topper for each cupcake!


ITALIAN TRI-COLORED COOKIES 
look like little pieces of heaven!


  The Italian Tri-Colored Cookie is the yummiest, moistest almond cookie thats like a cake!
It is basically thin layers of almond cake layered with apricot preserve and topped with semisweet chocolate!   My friends and family look forward to this delectable treat at Thanksgiving and Christmas!! I would even make bricks of it and carry it on the chinatown bus to bring with me to their houses!  If it can survive a 4 hour trip from VA to NJ then its totally worth making :D


SALTED CHOCOLATE CHIP COOKIES!


 I use the Joy of baking Chocolate Chip cookies recipe and then add an extra 1 tsp of kosher or coarse salt and when you eat this you get a slight kick of salty crunch which create a nice texture to the chocolate chip cookie!   It makes it almost savory but still sweet, it cuts the sweetness ever so slightly.  Not but a glass of cold milk is needed!  
I hope you find these treats just as tantalizing as they are delicious!  
 
 
Merry Christmas!!!!!!!

Sunday, December 20, 2009

The Blizzard Bride!


A tribute to my very first wedding cake created  and to be delivered on the weekend of BLIZZARD OF 2009!  I nicknamed this my Blizzard cake!  I never thought that I wouldn't love snow... I miss the elated feeling of having no school and being able to play in the snow all day but I do not enjoy it as much as an adult!  And making wedding cakes and delivering them in the wintry weather is absolutely scary!

The amount of snow forecasted for December 19th was 24 inches!  Which was an AWFUL LOT for Northern VA!   So for the Tao Wedding I had to bump up their cake schedule and I finish the cake by Friday night so that I could deliver it that night before we got dumped with massive amounts of SNOW!!

So I talked to the restaurant manager at Good Fortune and he was expecting me to deliver by 11 pm but because it was already snowing my 9pm, he was going to close the restaurant early.    But by some miracle he was really nice and he said that he would wait for me to arrive and that I should just drive carefully.  Remind me to give them a great review for their flexibility and services!!  So the manager Frank waited for me to get there....and I arrived at 12:45 AM!!!  I left my house at 10:20pm and it took me 2 hours and 15 minutes to get to Wheaton, MD to to drop off the cake before the BIG STORM!!  It was already snowing and there was about 4 inches on the ground.  I was lucky enough that my nice boyfriend drove me in the snow and we got home by 2:30 am :)  BOY that was one of my longest nights since I was in college.

I wish I remembered to take pictures when I was on the road that night, it was very snowy!  But I was able to stay in Saturday and relax and enjoy the lovely blanket of snow the next day :)


Here is Brandon shoveling the snow off my car!  What a nice boyfriend!


I'm here standing in 20 something inches of snow on Saturday!  Here's to the Blizzard of 2009!!!

**OH!! Later, I found out the wedding and reception was pushed back until Sunday...so I hope the bride still enjoyed her wedding day :)

Tuesday, December 15, 2009

Channel your Chanel!


Birthdays are a great time to pamper your female loved ones with CHANEL!  A "Pretty in Pink" Chanel bag for my friend Sue! :) 

I started with layering the Red Velvet cake in layers to be the shape of the purse standing up!  The Red Velvet cake recipe I use is the best and moist I have ever found, I absolutely love it!   I tried about 6 recipes before I appreciated this one :D


I also used a reference picture of the real pink Chanel handbag below:


After careful examination of the bags... I made all the seperate compotes I needed for the cake.  I carved out the cake with the shape and then laid pink fondant over it.

Then I quilted the front side and the width side of the cake then I rolled out another piece of fondant and cut it as the width and measured it to the height plus the height of the cake and quilted it.  Then I lifted off that piece of fondant and laid it over the cake. 

When it is layered over the already covered cake pul the 2 ends a little to stretch it so it looks like the flap of the handbag.


Then I had made the Coco Chanel logo using circle cookie cutters and then trimming out the sides so the look like the letter "C" and also made gold circles for the holes of the handbag's handles.  So I made yellow fondant pieces and then brushed it with gold pearl dust.

Then I used  pink ribbon and used a Clay gun to extrude a rope with yellow fondant  and then I brushed in with gold pearl dust and then braided it with the pink ribbon.

Once I braided the chain for the Chanel bag, I had to use a cookie cutter to cut out circles at the top of the cake, then I attach the gold circles with the bottom brushed with water to attach it to the purse cake. Then I used royal icing to attach the chain as the strap of the purse.


Yay!  The gold chain is attached and the Chanel signature logo is attached as part of the purse flap!  The cake is ready to go!!  Always take lots of pictures!!  I love Chanel bags, they are soo fabulous! :D


Thursday, December 10, 2009

Gold, Leaves & Luster


Look familiar? 
The Luster & Leaves design has become my most popular cake design :) 
I have here the Luster & Leaves design with gold studs and gold pearl border.  


I created this cake for a 50th anniversary and it is adormed with yellow sweetheart roses, orchids and ferns.  The cake is vanilla bean cake with raspberry buttercream and vanilla bean cake with lemon curd.


Come back for more pictures of cakes! :)

Monday, November 9, 2009

Mom's love Chanel!


Every girl dreams of Chanel and every girl deserves one :)  
For my mothers birthday I made her a pink Chanel make-up bag!

This was actually my version of a chanel make up bag I made the cake before I actually saw the Chanel make up bag.

Here is a picture of the new Chanel cosmetic bag.


The birthday cake is Vanilla Bean Cake with strawberry buttercream.  
To make the cake, I used a clay extruder gun to squeeze out fondant to make the rope border and a small fine quilter to quilt the pattern on the fondant. Then a zig zag quilter to make the zipper. 


 Here is the close up where you cake see the rope border along the quilted sides.
I had my friend Saqib help me pump the fondant out because it take massive strength to get a long consistent rope! 

Here I used the Zigzag quilter by Wilton to make the zipper line.


I attached side strap attachments for the make up bag but I ran out of time to make my mom the straps to the bag but its ok since this is a cosmetic bag.   I also decided to add black leather reinforced corners because it made the bag look much better. 


I loved this cake, it is so cute!   And next month I have more Chanel cakes to come.

Also these pictures where taken with my new camera the Panasonic LUMIX so the macros quality is so much clearer!  YAH!! :D

Check back for more fun birthday cake pictures :)

Friday, October 30, 2009

The Game of Go!


The chinese game of "Go" is called Wei-Qi. The game is played by two players who alternately place black and white stones (playing pieces, now usually made of glass or plastic) on the vacant intersections of a grid of 19×19 lines. The object of the game is to control a larger portion of the board than the opponent. A stone or a group of stones is captured and removed if it has no empty adjacent intersections, the result of being completely surrounded by stones of the opposing color. ( provided by Wikipedia!)


My friend Clara thought her dad would like this as his birthday cake, so here I have constructed the "Go" or "Wei-qi" board using ivory and tan fondant. Clara's cake is green tea cake with red bean buttercream!  Sticking with the asian cake flavors :D 
I used custom black and white M&M's as the game pieces. 


Here are the black and white M&M's for decorating and the blank game board I just created by using a ruler to cut thin strips of black fondant for the lines on the game board.  


Technically I am playing myself here!  AH HA!  I am playing while attaching the game pieces!  I think I am my own worse enemy...cuz it looks like a tie the way I placed the M&Ms...LOL :D


 Anyone up for a game of GO?  Or just some cake????
 

Tuesday, October 6, 2009

Treasures of Time


Have you ever had a special memorabilia that you have kept for a long time?  
For this wedding cake, I had a lovely couple with a very special bridal wedding topper that they wanted to adorn the cake. It was truly very treasured.


This buttercream wedding cake is Marble Swirl cake with Bing Cherry buttercream.  The tier sizing is offset square 5", 8" and 12" inch cakes and the cake is decorated with champagne colored buttercream swirls and a custom designed stencil for the middle tier.  I actually created the stencil to look like the design of the brides dress.  The cake is then decorated with handmade fondant bows.

First I began this cake by creating the bows of the cake with the champagne color to match the buttercream :)


So for the fondant bows you use a JEM bow cutter and then use rolled cotton cylinders to dry the bows.  You can make your bows up to a couple weeks ahead as long as you don't have to use colors that will fade. 


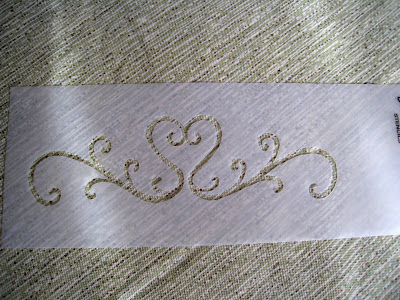
 Moving on to the buttercream tiers!   Yay!  Fun Stencils :D  Here is the hand-drawn stencil that I made of the brides design from her dress. 


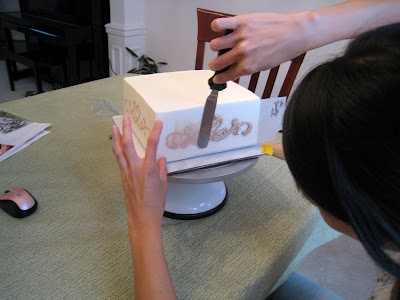
Gently line up the stencil against the side of you cake tier.. be sure to line up the design in the center.  Then pipe some frosting along the stencil design.  Using an offset spatula evenly in one motion smear the buttercream across without lifting until you are at the end of the design.  


Then just gently peel away the stencil and VIOLA!! Your design is perfect!


After completing all the stenciling, I went ahead and piped swirly swirls all over the top and bottom tiers.  Once all that is done they go back into the fridge to firm up!    Once the designs are all firm its time to stack!!  OR you can stack all the tiers first and then apply designs, it involves more skill to do it that way because you have less room for error once the cakes are stacked.


Now I have to make the tails of the bows they look like real BOWS!  The tails are usually soft so you have to wait until you are ready to decorate the cake to apply the bow tails with the bow.


Once you have created the bow tails then you apply pearl dust and then attach it to your bow and pipe a little bit of buttercream and lay the bow down.


I have finally completed all the decorations on the cake and it is ready to transport.


*TIP - for large wedding toppers that are fragile, do not place on the cake until you get to the wedding reception site because they can be harmed on route during the delivery.  Just plan all the things you made need for the topper's support.


Here is Cheri and Chris's wedding cake with a topper that is to be treasured :)