Followers

Monday, November 9, 2009

Mom's love Chanel!


Every girl dreams of Chanel and every girl deserves one :)  
For my mothers birthday I made her a pink Chanel make-up bag!

This was actually my version of a chanel make up bag I made the cake before I actually saw the Chanel make up bag.

Here is a picture of the new Chanel cosmetic bag.


The birthday cake is Vanilla Bean Cake with strawberry buttercream.  
To make the cake, I used a clay extruder gun to squeeze out fondant to make the rope border and a small fine quilter to quilt the pattern on the fondant. Then a zig zag quilter to make the zipper. 


 Here is the close up where you cake see the rope border along the quilted sides.
I had my friend Saqib help me pump the fondant out because it take massive strength to get a long consistent rope! 

Here I used the Zigzag quilter by Wilton to make the zipper line.


I attached side strap attachments for the make up bag but I ran out of time to make my mom the straps to the bag but its ok since this is a cosmetic bag.   I also decided to add black leather reinforced corners because it made the bag look much better. 


I loved this cake, it is so cute!   And next month I have more Chanel cakes to come.

Also these pictures where taken with my new camera the Panasonic LUMIX so the macros quality is so much clearer!  YAH!! :D

Check back for more fun birthday cake pictures :)

Friday, October 30, 2009

The Game of Go!


The chinese game of "Go" is called Wei-Qi. The game is played by two players who alternately place black and white stones (playing pieces, now usually made of glass or plastic) on the vacant intersections of a grid of 19×19 lines. The object of the game is to control a larger portion of the board than the opponent. A stone or a group of stones is captured and removed if it has no empty adjacent intersections, the result of being completely surrounded by stones of the opposing color. ( provided by Wikipedia!)


My friend Clara thought her dad would like this as his birthday cake, so here I have constructed the "Go" or "Wei-qi" board using ivory and tan fondant. Clara's cake is green tea cake with red bean buttercream!  Sticking with the asian cake flavors :D 
I used custom black and white M&M's as the game pieces. 


Here are the black and white M&M's for decorating and the blank game board I just created by using a ruler to cut thin strips of black fondant for the lines on the game board.  


Technically I am playing myself here!  AH HA!  I am playing while attaching the game pieces!  I think I am my own worse enemy...cuz it looks like a tie the way I placed the M&Ms...LOL :D


 Anyone up for a game of GO?  Or just some cake????
 

Tuesday, October 6, 2009

Treasures of Time


Have you ever had a special memorabilia that you have kept for a long time?  
For this wedding cake, I had a lovely couple with a very special bridal wedding topper that they wanted to adorn the cake. It was truly very treasured.


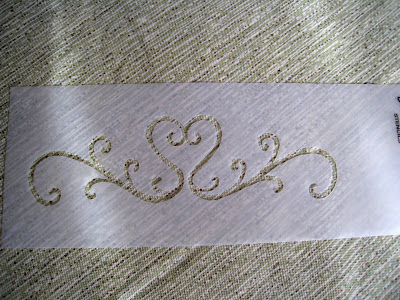
This buttercream wedding cake is Marble Swirl cake with Bing Cherry buttercream.  The tier sizing is offset square 5", 8" and 12" inch cakes and the cake is decorated with champagne colored buttercream swirls and a custom designed stencil for the middle tier.  I actually created the stencil to look like the design of the brides dress.  The cake is then decorated with handmade fondant bows.

First I began this cake by creating the bows of the cake with the champagne color to match the buttercream :)


So for the fondant bows you use a JEM bow cutter and then use rolled cotton cylinders to dry the bows.  You can make your bows up to a couple weeks ahead as long as you don't have to use colors that will fade. 


 Moving on to the buttercream tiers!   Yay!  Fun Stencils :D  Here is the hand-drawn stencil that I made of the brides design from her dress. 


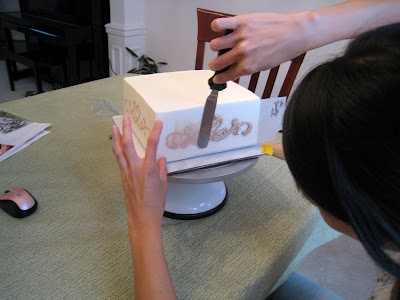
Gently line up the stencil against the side of you cake tier.. be sure to line up the design in the center.  Then pipe some frosting along the stencil design.  Using an offset spatula evenly in one motion smear the buttercream across without lifting until you are at the end of the design.  


Then just gently peel away the stencil and VIOLA!! Your design is perfect!


After completing all the stenciling, I went ahead and piped swirly swirls all over the top and bottom tiers.  Once all that is done they go back into the fridge to firm up!    Once the designs are all firm its time to stack!!  OR you can stack all the tiers first and then apply designs, it involves more skill to do it that way because you have less room for error once the cakes are stacked.


Now I have to make the tails of the bows they look like real BOWS!  The tails are usually soft so you have to wait until you are ready to decorate the cake to apply the bow tails with the bow.


Once you have created the bow tails then you apply pearl dust and then attach it to your bow and pipe a little bit of buttercream and lay the bow down.


I have finally completed all the decorations on the cake and it is ready to transport.


*TIP - for large wedding toppers that are fragile, do not place on the cake until you get to the wedding reception site because they can be harmed on route during the delivery.  Just plan all the things you made need for the topper's support.


Here is Cheri and Chris's wedding cake with a topper that is to be treasured :)


Sunday, September 6, 2009

Future CRNA!

What is a CRNA?

I asked myself the very same question when my friend Mike asked me to make a cake for his wife, Tracy! I would like to think it stands for "Cake Recipe Naming Artist".........................but it actually stands for "Certified Register Nurse Anesthetists".

Way off!.. shows you how much cake is on my mind :D

Taa Daahh! The birthday cake that I made for Tracy! It is covered with shades of lime green and magenta polka dots. Then I hand sculpted a fondant figure of Tracy in a traditional nurse outfit!

A picture of the polka dots decorations on the side of the cake. I started the cake construction the night before by decorating the cake with polka dots.

I have made all sorts of polka dots to be placed on the cake. This process is actually very strategical as you don't want too many of the same shape or color polka dot on one side.

The night before was when I was completing the figure of Tracy. Here is her head while I am drawing the eyes and the mouth onto the face, before I connect the head to her body.

I made all her body parts a couple of days in advance so that it will be firm for when I assemble. Then I put her body together and made clothing for her figure using white fondant. I carefully positioned her body to sit on the cake and then I place on the head to complete the figure.

Here is the completed figure ready to go on the cake. There are support toothpicks under her figure to keep her on the cake.

Here is the day of pick up where I take pictures of the cake with nartural daylight!

Yay! Tracy's birthday cake is Chocolate butter cake with Raspberry Buttercream and it's traveling all the way to Maryland :D

I have her cake wrapped up in a cake box with the lid taped half open because the figure is too high for me to close the box. I also created a viewing window to the cake by taping saran wrap over the open area of the box so you can still see the cake. Now you've just created your own window cake box! Nifty, huh?! I love cake boxes with windows and being able to see the cake. Yay!

Wonderful birthday wishes to my friend Tracy and her future as a CRNA! Hooray ^_~

Thursday, August 20, 2009

Fans of Dragonballz!

One of the most popular Japanese Animation for guys was Dragonballz!

I used to watch this anime with my brother when I was young! The fighting scenes were always very intense! I have created the character Goku for a birthday cake! :)

Here are a couple of reference pictures of the plastic Goku toys from BANDAI as a reference.


This is a mini Chibi style toy of Goku - it's a child like version of him which I think looks the best for the cake. The adult version of Goku is scary and is very difficult to make partly due to all his muscle details on his legs and arms...haha!

The cake is vanilla bean cake and strawberry buttercream.

The creation of the Goku the main character was a long process which includes many stages and good internal structure. I use wooden toothpicks for the internal structure of the figures I make. You can use wires or lollipop sticks as well. But remember although it is made of edible sugarpaste/gumpaste, we DO NOT EAT the decorative pieces! It's too dangerous..so it's only for show! :)
The reason we cannot eat it is because of all the dangerous materials that are used to hold the pieces together. No one wants choke on a toothpick, plus gum-paste tastes very BLAH! **

I begin by making all the body parts individually of each other, so later I can attach them together with toothpicks.

Here I have constructed Goku's upper body and his legs with are the pants of his fighting uniform.

I rolled out orange colored sugar paste and cut out a neck hole in the shirt for Goku's uniform. I made a hole for his neck area and will gather all shirt together at the bottom to attach to the lower body! You can make the gumpaste stick by brushing a little water on the area you are attaching.

Then I used a tool to put creases under where Goku's arm pits would be. Using a toothpick the in insert the upper body into his legs and let is harden in a plastic flower making tray. Once this hardens I will make the little black belt and just tie it around his waist.

For the birthday polka dot, I cut out a large green polka dot and used edible food color pens and wrote Happy Birthday Nicholas. I used speciality number cookie cutters to cut out the "2" and the "5" for the "25' on the polka dot!

Goku's head is the most complicated and largest part of the entire body. You must make his head out of sugar-paste and let it harden for 2 days.

Once the head of the figure has harden, you can apply the hair by sculpting it to the head.

I did Goku's hair in 2 stages. Once with just the base hair and then I attached the spikes seperately.

Here is a pictures of Goku's body parts completed and ready for assembly onto the cake.

Here I have part of Goku's main boy assembled onto the cake to keep him put and then next to attach his arms to his body. To create the land stump effect I used a tan colored fondant and then made green decorating icing and piped greenery/ scrub like grass on top and the sides of the land stump. I create the rocky wall I used a fondant tool and carved lines along the sides of the cake.


Here is a close up of the Goku cake completed without the Dragonballs. I have just completed the green bush/scrub piping on the edge border of the cake.

Now I will use a pastel yellow fondant and roll out a couple of "Dragonballs" to put onto the cake.


The dragonballs are rolled into balls with yellow fondant and let harden for about 2 hours. Then using an orange food color pen, draw the number of stars on the balls. There are a total of 7 dragonballs! Now Goku and his dragonballz are ready to go! :D In the words of Goku - "HAMEHAMEHAAA!"