Have you ever had a special memorabilia that you have kept for a long time?
For this wedding cake, I had a lovely couple with a very special bridal wedding topper that they wanted to adorn the cake. It was truly very treasured.
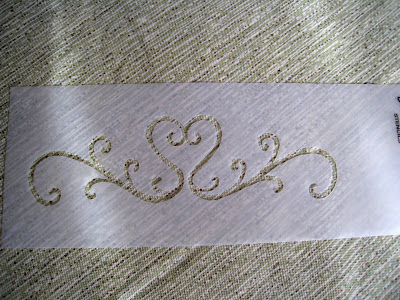
This buttercream wedding cake is Marble Swirl cake with Bing Cherry buttercream. The tier sizing is offset square 5", 8" and 12" inch cakes and the cake is decorated with champagne colored buttercream swirls and a custom designed stencil for the middle tier. I actually created the stencil to look like the design of the brides dress. The cake is then decorated with handmade fondant bows.
First I began this cake by creating the bows of the cake with the champagne color to match the buttercream :)
So for the fondant bows you use a JEM bow cutter and then use rolled cotton cylinders to dry the bows. You can make your bows up to a couple weeks ahead as long as you don't have to use colors that will fade.
Moving on to the buttercream tiers! Yay! Fun Stencils :D Here is the hand-drawn stencil that I made of the brides design from her dress.
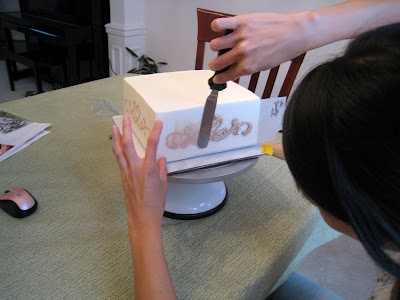
Gently line up the stencil against the side of you cake tier.. be sure to line up the design in the center. Then pipe some frosting along the stencil design. Using an offset spatula evenly in one motion smear the buttercream across without lifting until you are at the end of the design.
Then just gently peel away the stencil and VIOLA!! Your design is perfect!
After completing all the stenciling, I went ahead and piped swirly swirls all over the top and bottom tiers. Once all that is done they go back into the fridge to firm up! Once the designs are all firm its time to stack!! OR you can stack all the tiers first and then apply designs, it involves more skill to do it that way because you have less room for error once the cakes are stacked.
Now I have to make the tails of the bows they look like real BOWS! The tails are usually soft so you have to wait until you are ready to decorate the cake to apply the bow tails with the bow.
Once you have created the bow tails then you apply pearl dust and then attach it to your bow and pipe a little bit of buttercream and lay the bow down.
I have finally completed all the decorations on the cake and it is ready to transport.
*TIP - for large wedding toppers that are fragile, do not place on the cake until you get to the wedding reception site because they can be harmed on route during the delivery. Just plan all the things you made need for the topper's support.
Here is Cheri and Chris's wedding cake with a topper that is to be treasured :)


